Life story - the short version


I'm a fun loving 30 something year old . Married my favourite guy. Started on my production of children & number 1 is an adorable boy. Big on family. Big on craft. Love country music. Love fuss free + practical ...aaand maybe with just a little bow for decoration!

Love the law of attraction too. And singing ...dancing ...bright colours and excessive punctuation ...and stationery.

Sunday, August 14, 2011

Part 2 of my completed projects (Stuff for myself or my son)

Here are a few other items I've made for myself or my son:
 
A wall hanging for my kitchen that says "If it tastes good, it feeds your soul". Note that this matches the quilt I made for my loungeroom in part 1 of my projects 'cause I loved the fabrics. I didn't follow a pattern, I just made it up.

I love love love practical solutions that are also cute. I tend to craft items which are practical. I needed to press a lot with patchworking but the mini ironing boards I found were 50 bucks so I just made some with a piece of wood from my husband's "stash" (haha it's kind of the same as my stash), a piece of Insul~Bright heat resistant batting (for cooler bags etc.) and some other leftover materials.


A hand pieced patchwork before I knew you could do it using the machine!!
I did the cross stitch myself as well.


A doll I made using a pattern from Patchwork & stitching magazine


My raw edge applique cushion cover. First time stipling and raw edge appliqueing in a class at All about Sewing, Charmhaven, NSW Australia by Allison Nicoll my dear friend.


Saturday, August 13, 2011

When life hands you lemons ...make a lemonade coloured wipes cover

I've just put a pot of tea-for-one on to brew while I write this blog. Gosh I love tea. If you have more than 5 cups of tea a week, you seriously need to get one of these tea-for-one teapots and a pack of loose leaf tea because it's ...just the bomb. So easy, and -hey- you could get hit by a bus tomorrow so live like it's your last day and treat yourself with little pleasures!

Anyway, why am I here? I got sick of looking at the container of wipes that I keep in my lounge room. It's the one room in the house that stays the tidiest, and even when everything is cleared up, this seemed to make the place look untidy:
I normally get the thinner wipes, but the container looked a little better than the cheaper wipes as a permanent fixture in the loungeroom. But I knew it could look even nicer.

I made this using a fat quarter and I'm really happy with it!

Here's how:
You just need co-ordinating thread and enough elastic to go almost all the way around your lid measurement. I don't know what my measurement was because I always thread the elastic first then tie it and THEN cut it from my roll. My guess is about 30cm or 12in long.

FIRST, lay out your fat quarter (piece of fabric about 18x22 inches) and trace around your wipes box base on the wrong side of the fabric. Draw some tabs out all four sides like below.
I have a Sewline air erasable pen which has ink that disappears after a while (or if you steam iron it, immediately) so that's what I use. You can use taylor's chalk or whatever.

You could measure your wipes tub, but I just tipped it over and traced around it.
For the record, my tub is about 10x11x20cm or 4x4 1/2x8 inches.

SECOND, add a little length to the tabs of your shape. (If this becomes too confusing, simply cut out the tabs as wide as the edges of your fat quarter allows like I did. You can always cut off excess if need be).
You'll need to fold the edge over twice to create a neat elastic casing. It needs to be at least twice as wide as the elastic you're using, and add two seam allowances (seeing as it will be doubled over when you create the casing).
If you need to know how to create casing for elastic there are a bazillion tutorials available online.

Thirdly, add your seam allowance. This is really important! The actual seam allowance is whatever you like to work with. Best off sewing it too large and you can take it in. Mine is a bit loose but with the elastic case I left it loose. I don't like doing things twice.

Then cut it out and hoard your scraps haha.

NEXT, sew the cut edges with RIGHT sides together. This will give you a cube kind of shape with an open top.
In this picture I've already sewn the elastic casing, but you're not that far ahead yet, this is just to demonstrate sewing the cut out corners right side together.

Test your wipes box to see if you passed the measuring test, and if so create your elastic casing around the top. Insert your elastic and wait for an excuse to need your wipes!

TIP
I get worried I'm going to forget to leave a hole to insert the elastic into, so I sew a few centimetres first and then lift the sewing machine foot and drag the thread a few centimetres and then begin sewing again (backstitching each side). Then I can sew around to the beginning without the stress of going too far. Here's how it looks:
If you like you could sew it shut after you've inserted the elastic but I don't bother.

Please send me a pic if you make one of your own, I'll add it here!
Thanks for visiting :-)

Sunday, August 7, 2011

Sharing my projects (part 1 of, like, a million)

Well I said I'd like to share my completed projects. I think I might have to categorise them (for those on the spelling mistake hunt due to my original blog post, I'm Australian and spell categorise with an S where the yanks would've put a z ....but I'm glad you're on the ball *wink*)

So first things first, I'm a Singer Sewer. My sewing experience comes from a misguided high school timetable in which my class got sewing for two years in a row and never got food technology or home economics (so if my cooking sucks, that's my excuse! But I try. I'm sure I'll get to posting recipes on here one day). I didn't much sew again until my family put in to buy me my sewing machine for my 25th birthday present 5 years ago. I jammed it a few times and got scared and stashed it away (bet you can relate?)
Then divine inspiration, or whatever you want to call it, called me to quilt something. Christmas time in 2009 I got my sewing machine out, spent hours on you tube, and borrowed a hundred year old* ruler and mat from my husband's Nan (*Ok not a hundred years but well worn). And never looked back.

Here are my quilts in order of when they were made:
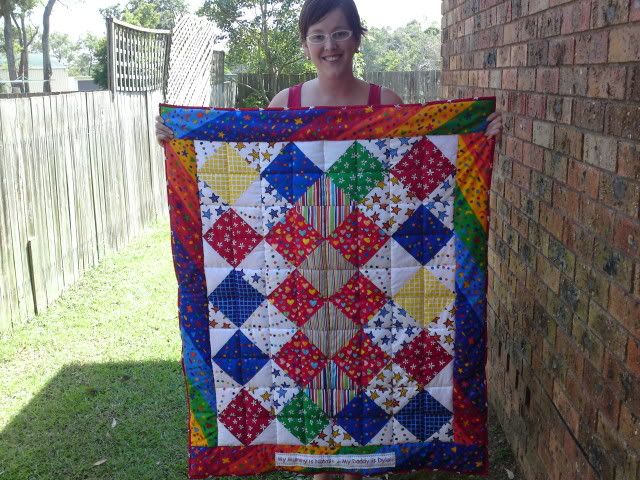
First ever quilt. For my bridesmaid's first son.
I gathered some of the blocks in the quilt instructions for "Patterson's curse" by Carolyn Davis in AUSTRALIAN QUILTERS COMPANION # 33 and made it up from there. Ran out of fabric a few times because I had no idea how to do patchwork, but it turned out awesome huh? I cross stitched the alphabet and a corresponding picture (IE S Snail Z Zebra etc) and "my Mummy is Danielle" and "my Daddy is Brett"
This was the next quilt, for my cousins-in-law. Natalie and Dylan
At the bottom there is backstitching that says "My Mummy is Natalie" and "My Daddy is Dylan" in variegated thread.
Once again, quilted at home with red thread (I simply love red). The fabric is mostly from the Newcastle Quilt Show in March 2010, and some if from the Maisy Mouse fabric range.
I was in love with half square triangles and didn't run out of fabric this time.

My version of Monica Poole's quilt named "Fancy free".
I added the "trams" of this quilt-as-you-go quilt to the back because I just thought the front would look better that way (and I still do).
The back:
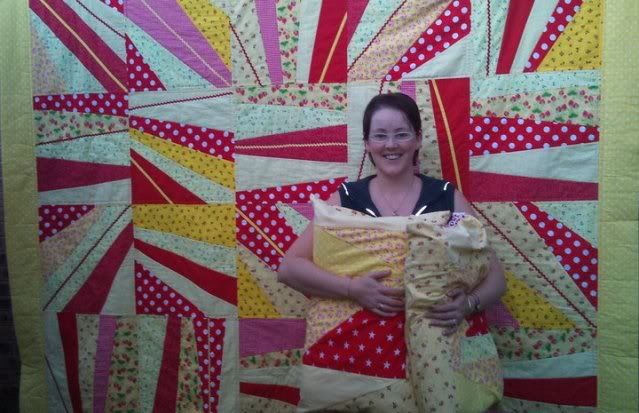
This was my first quilt for myself. And I made some pillowcases to match

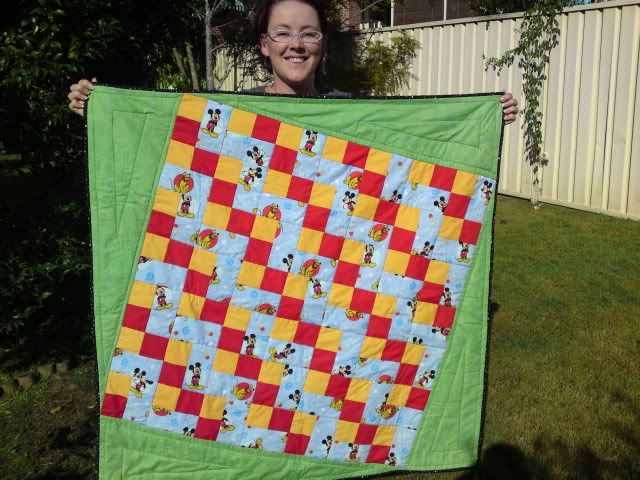
Another baby quilt. Finished June 2010
This is for a friend who didn't know the sex of their baby yet. I made the design up by myself and sorted the mickey fabrics so that Mickey is facing up for the most part.
It's looking a little boyish but turns out it was a boy anyway!
I learnt how to do the twisted border by borrowing a book from the library.

Here is one I made for myself, for about the house. I just love these fabrics & decided to keep it simple. Seeing as it turned out very out of shape, I decided instead of quilt "in the ditch" like I normally do, I would sew on buttons to secure the layers. There are about 4 buttons on there, maybe I'll get around to sewing some more on one day.


And a quilt for my first baby. You can kinda see my belly in this one hee hee. I was massive.

Wishes n dreams fabric collection by Melissa Saylor for Wilmington Prints. I bought this fabric before the baby was even conceived I just loved it so much!
I made a rocking chair top cover to go with it
Prairie points are fun. I try to learn something new with every new quilt.

And the most recent completed one is

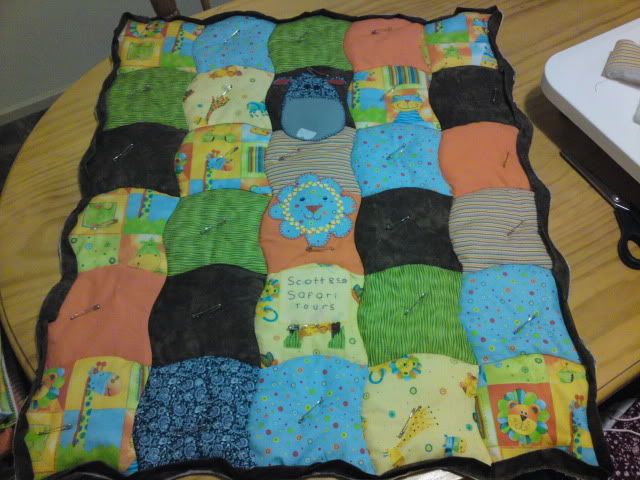
Using twisted squares ruler from Aussie Patches
The sign down the bottom says "Scott & Co Safari Tours" because the baby's last name is Scott. I love ricrac and made up the lion (in the middle) by myself. So cute! Made the hippo shape loosely based on the hippo images on the fabric collection.

Guess I should introduce myself, then

So I created this blog to have a little bit of online presence. My friends all said I should open a store and sell the things I sew. I just opened an Etsy store to share some of the items I made when inspired, but I'm not going to use.

Most things are either inspired from other blogs and tutorials, or a few out of necessity. For example, my 5 month old wanted to play with the foil bag in which the biscuits came, but I didn't want him to ingest any seeing as he's only had breastmilk up to this point, and I don't think foil packaging's on the recommended "feed your baby this" list haha. (See, I'm an awesome Mum!)
So I sewed it into a fabric cover for him. And like most of the time, the ideas rush into your mind at a rate too fast to comprehend, I ended up putting a furry shape on it. Originally intended to be a teddy, I realised I could add a smooth nose and it looked like a wombat (so lets just pretend it was meant to be a wombat from the start hey? *wink*).
I sewed some ribbon to the sides so we can tie it on to the car seat or playgym thingies etc.

Here is a picture of it, I hope to post lots more pictures of my projects to share....


I'm a pretty easy going chick from Australia. Except when it comes to spelling, and I admit I really like proper grammar and excessive punctuation. I even punctuate my text messages haha I can't help it. If you find a spelling mistake feel free to crucify me with comments hehe, I can cop it ...after all, I have two big brothers and two big sisters. They can dish it out, but they bought me my sewing machine when I turned 25 so what the hey ;-)

I talk heaps. Soon I will post more blogs and you will understand. I bet there are plenty of you out there with much in common. Would love to hear from you, and if you blog let me know the details and I'll come and visit!